Meta setup guide
เนื้อหานี้ยังไม่มีในภาษาของคุณ
What it is for
Section titled “What it is for”Follow this guide once, with the person who runs your Meta ads. It takes about 10 minutes. At the end you have two values from Meta, a Dataset ID and an access token, and your site sends its sign-ups and deposits to Meta from the server. There is no code to install.
Red boxes in the screenshots show where to click.
Before you start
Section titled “Before you start”- Use an established Facebook account in good standing. A new account is often blocked from Meta’s business tools.
- The account must have no advertising restrictions. Open facebook.com/accountquality: it should say No advertising issues.
- Do every step by hand. Never use browser automation, scripts or bots on Meta’s business tools: Meta restricts the whole business portfolio for it, with no ads and no audiences.
Step 1 - Log in
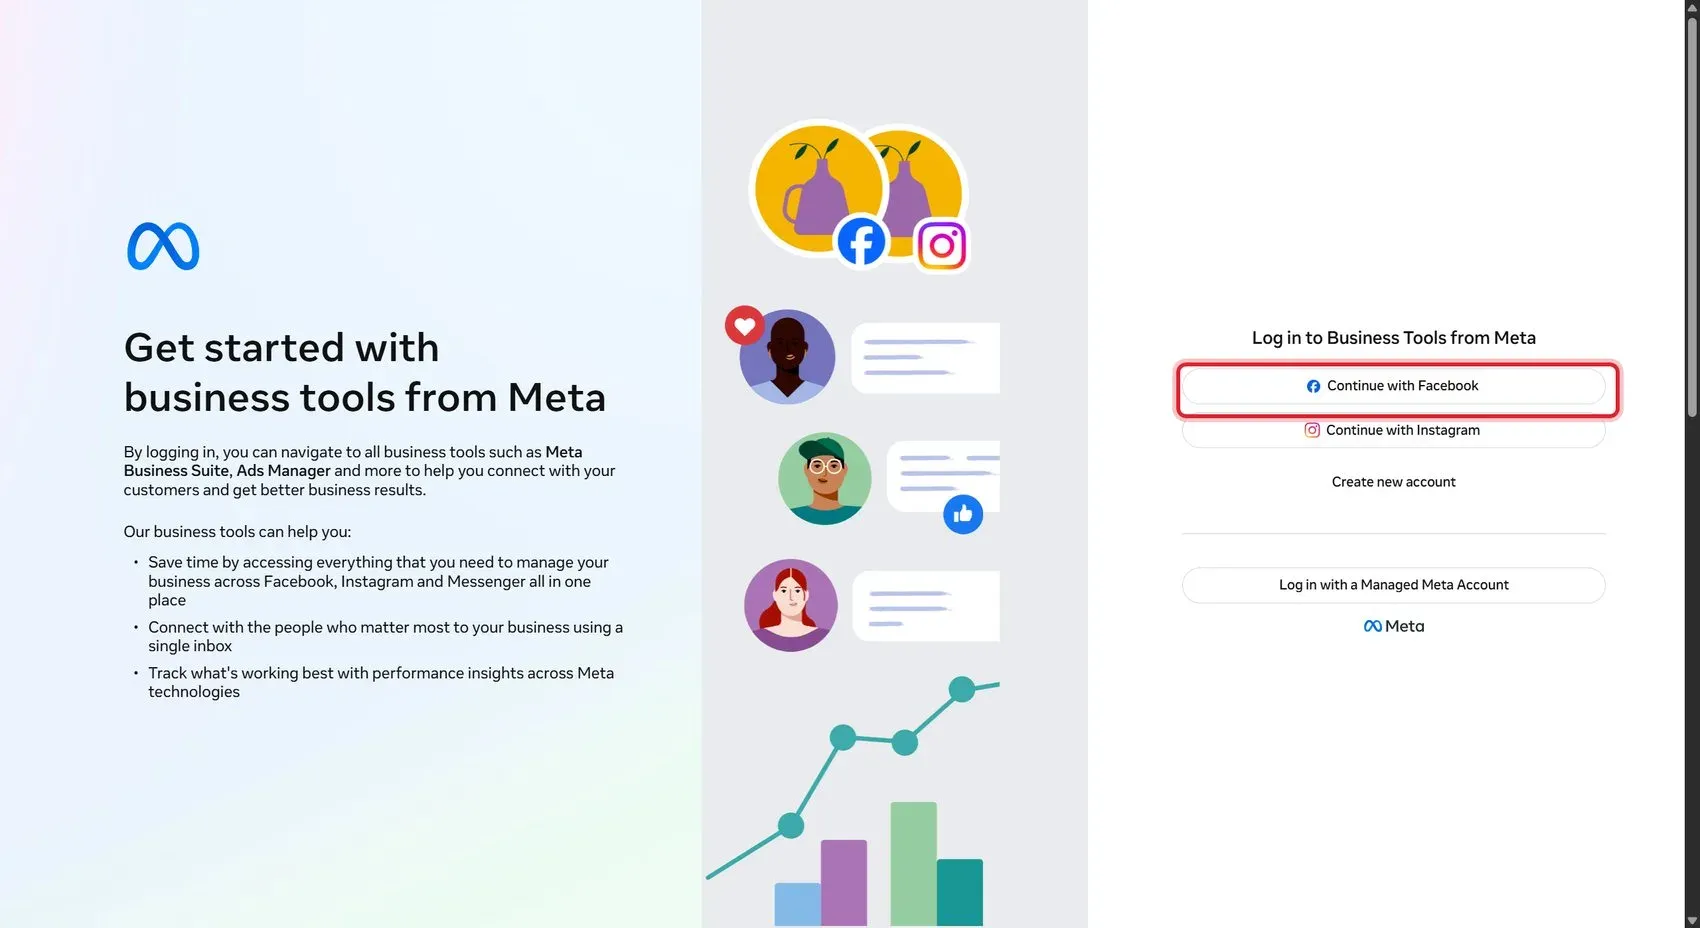
Section titled “Step 1 - Log in”- Open business.facebook.com.
- Click Continue with Facebook and log in.
Step 2 - Pick or create a business portfolio
Section titled “Step 2 - Pick or create a business portfolio”If you already manage a portfolio for this brand, use it and go to step 3. Otherwise create one:
-
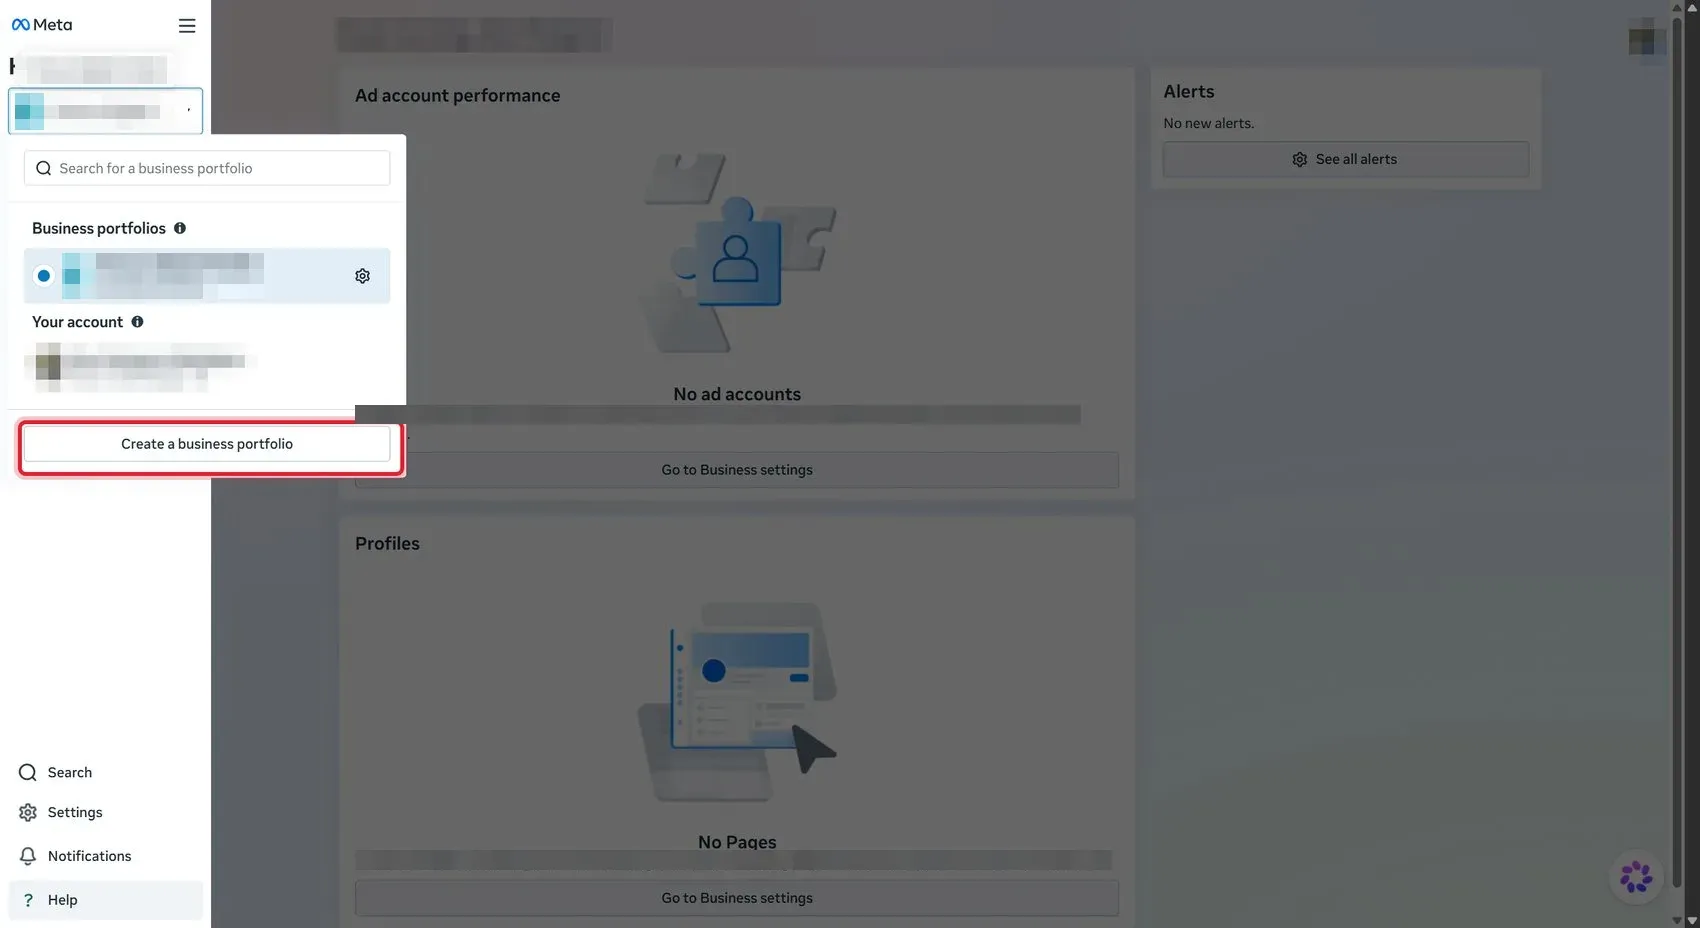
Open the portfolio selector at the top left and click Create a business portfolio.
-
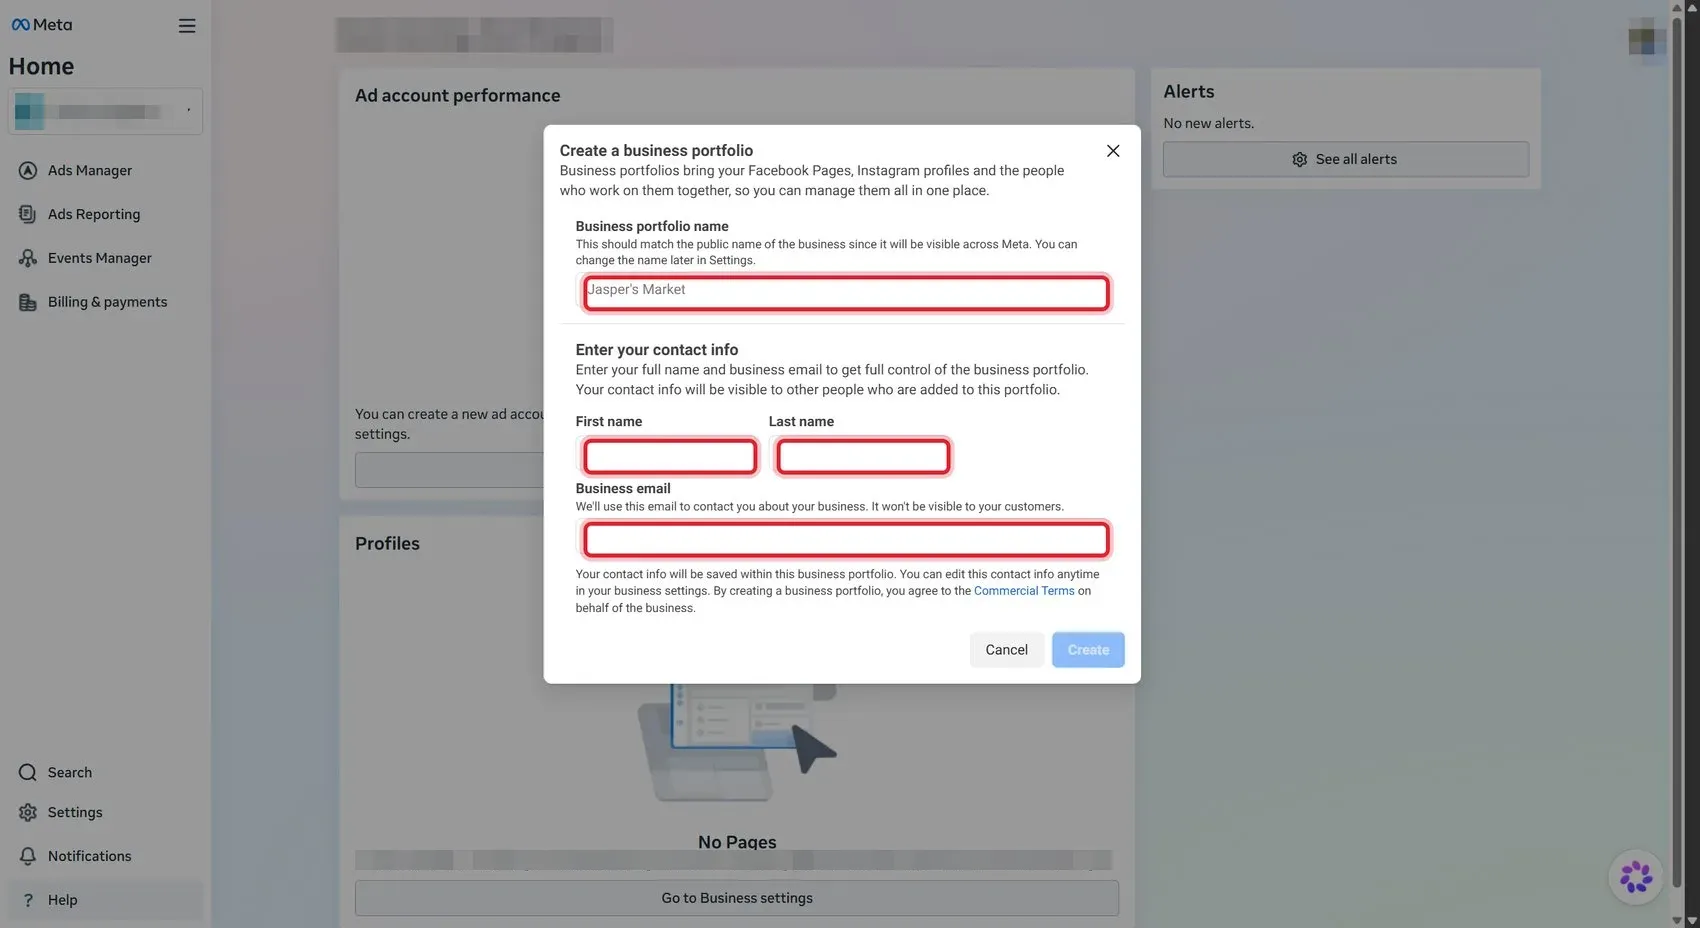
Fill in the portfolio name, your first and last name and a business email, then click Create.
-
Meta emails you a link. Open it to confirm the email.
Step 3 - Create the dataset
Section titled “Step 3 - Create the dataset”-
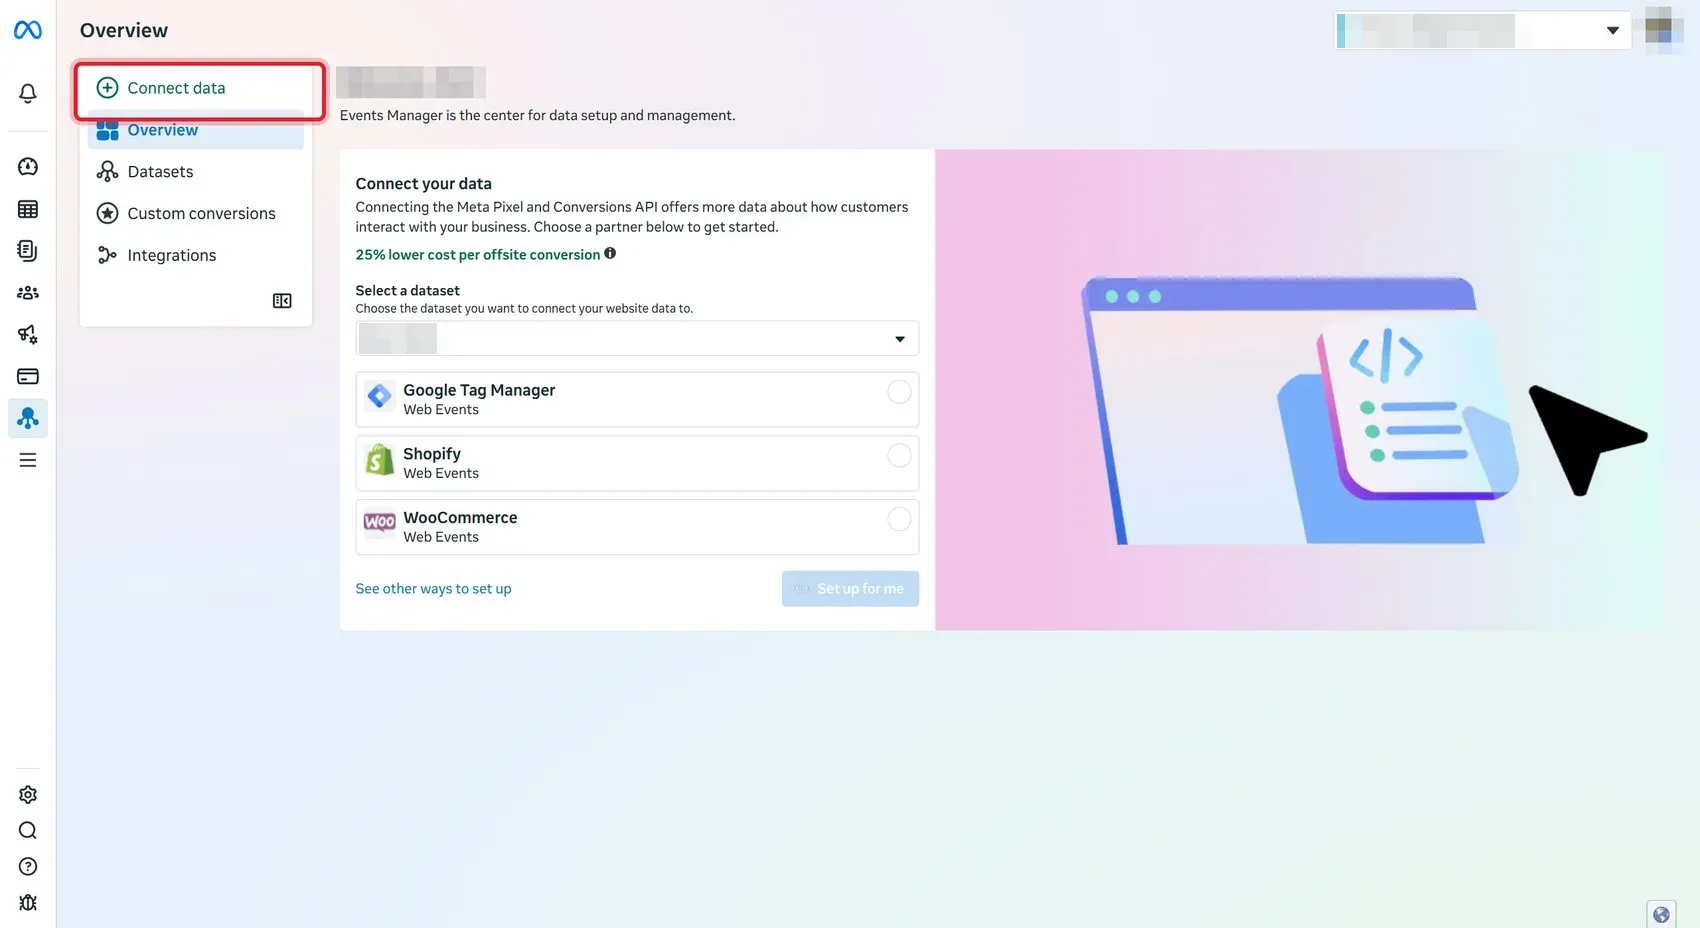
Open Events Manager (in the left menu, or business.facebook.com/events_manager2). Check that the right portfolio is selected at the top right.
-
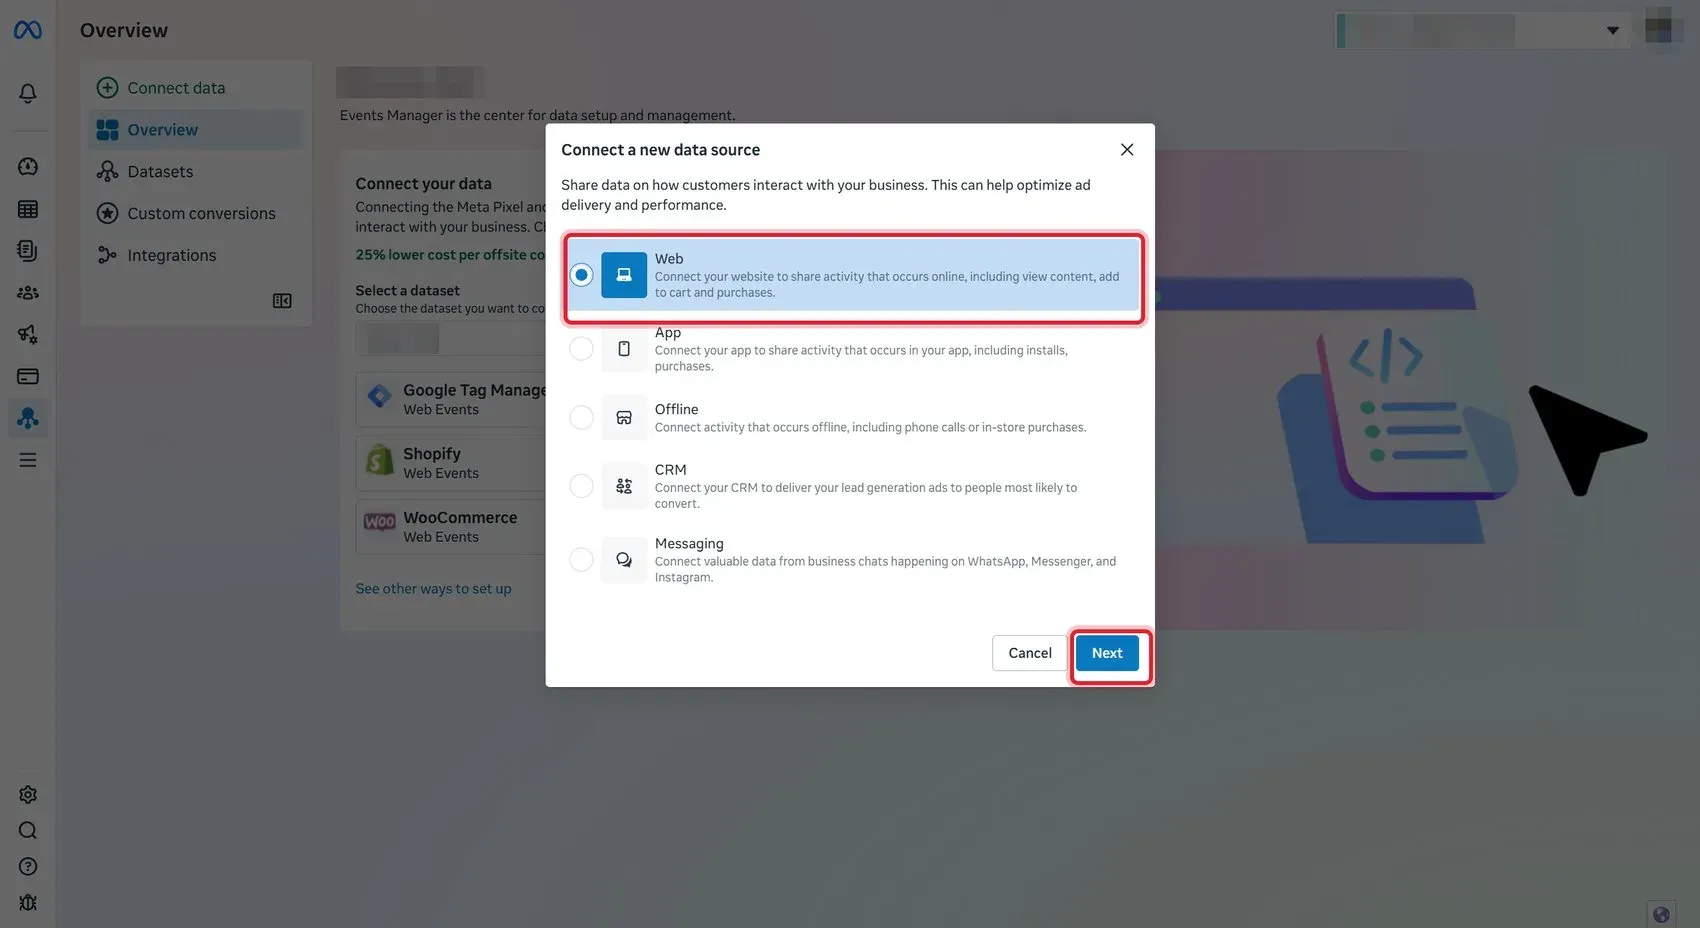
Click Connect data.
-
Choose Web and click Next. If the portfolio already has datasets, click Create new dataset.
-
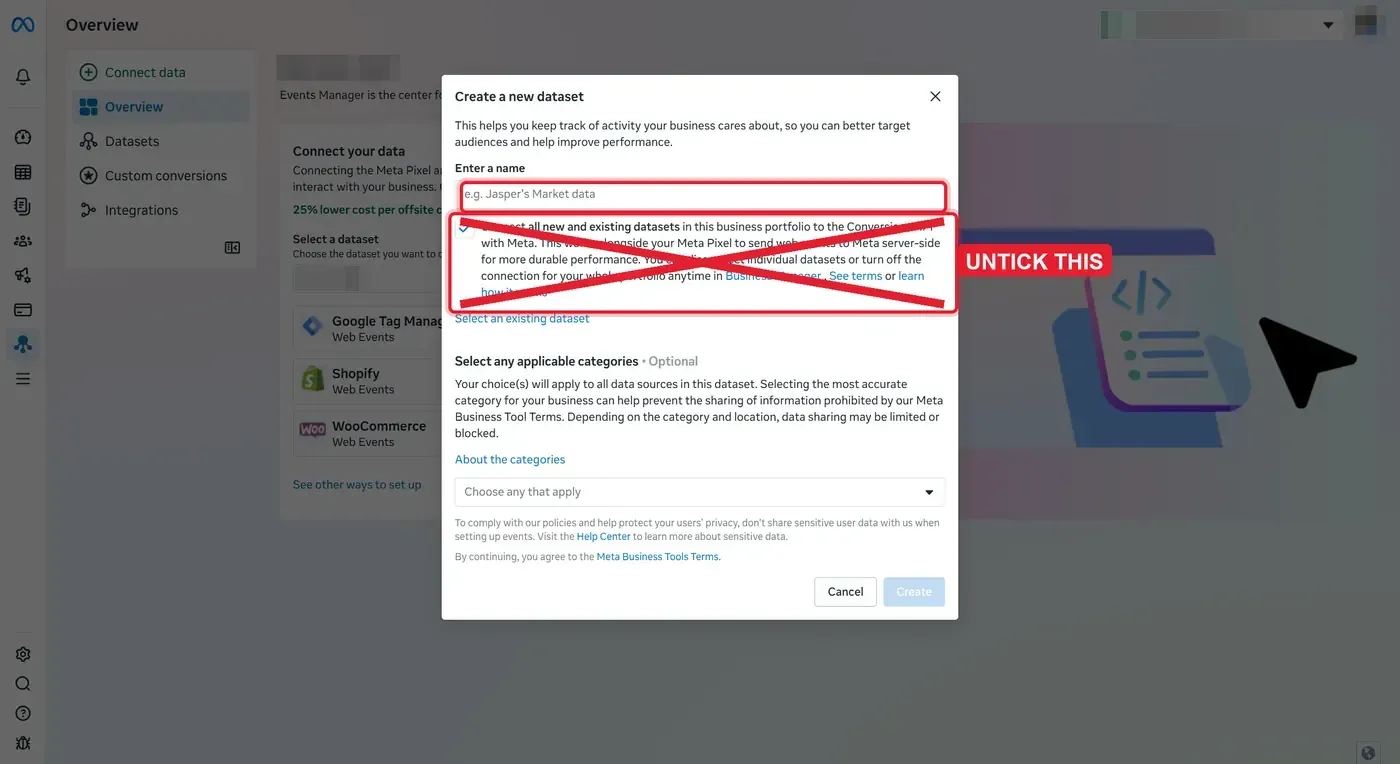
Enter a dataset name, for example your site’s name.
-
Untick the box “Connect all new and existing datasets in this business portfolio to the Conversions API with Meta”. Meta sometimes shows it ticked.
-
Leave the categories empty and click Create.
-
If a “Connect your web data” window opens, close it. There is nothing else to install.
Step 4 - Get the access token
Section titled “Step 4 - Get the access token”-
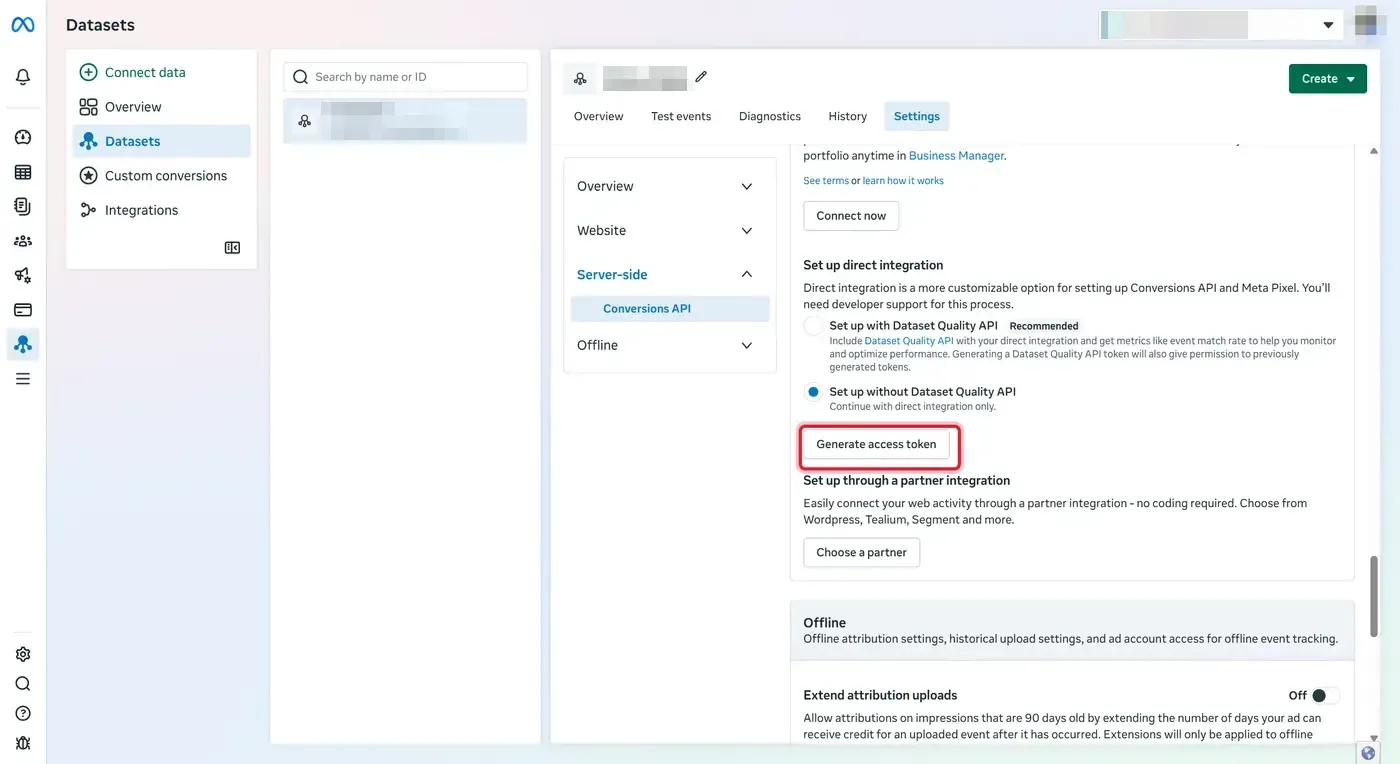
Open the new dataset and go to its Settings tab.
-
Scroll to Conversions API - Set up direct integration.
-
Choose Set up without Dataset Quality API.
-
Click Generate access token.
-
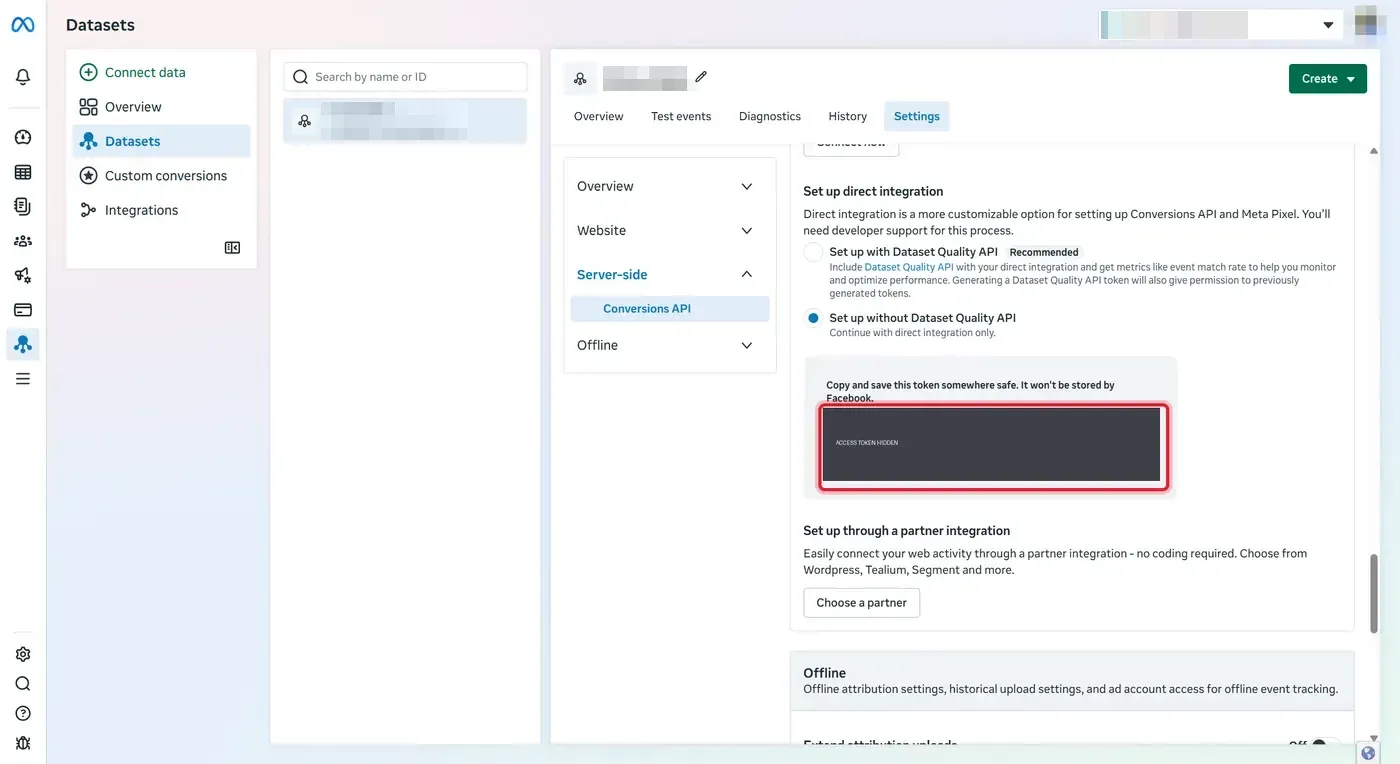
Copy the token straight away. Meta shows it only once. If you lose it, generate a new one.
- “Setup is currently blocked for this account” - the account you are logged in with has an advertising restriction. Ask another admin of the portfolio to generate the token.
- “Something went wrong” - reload the page and try again. It usually works the second time.
Step 5 - Get the test event code
Section titled “Step 5 - Get the test event code”The test event code lets test events show up live in Events Manager. You paste it beside Send test event when you test, and it is not saved anywhere. Meta still keeps test events for targeting and ads measurement, so test while you set up, and do not repeat the test on a pixel with live campaigns.
-
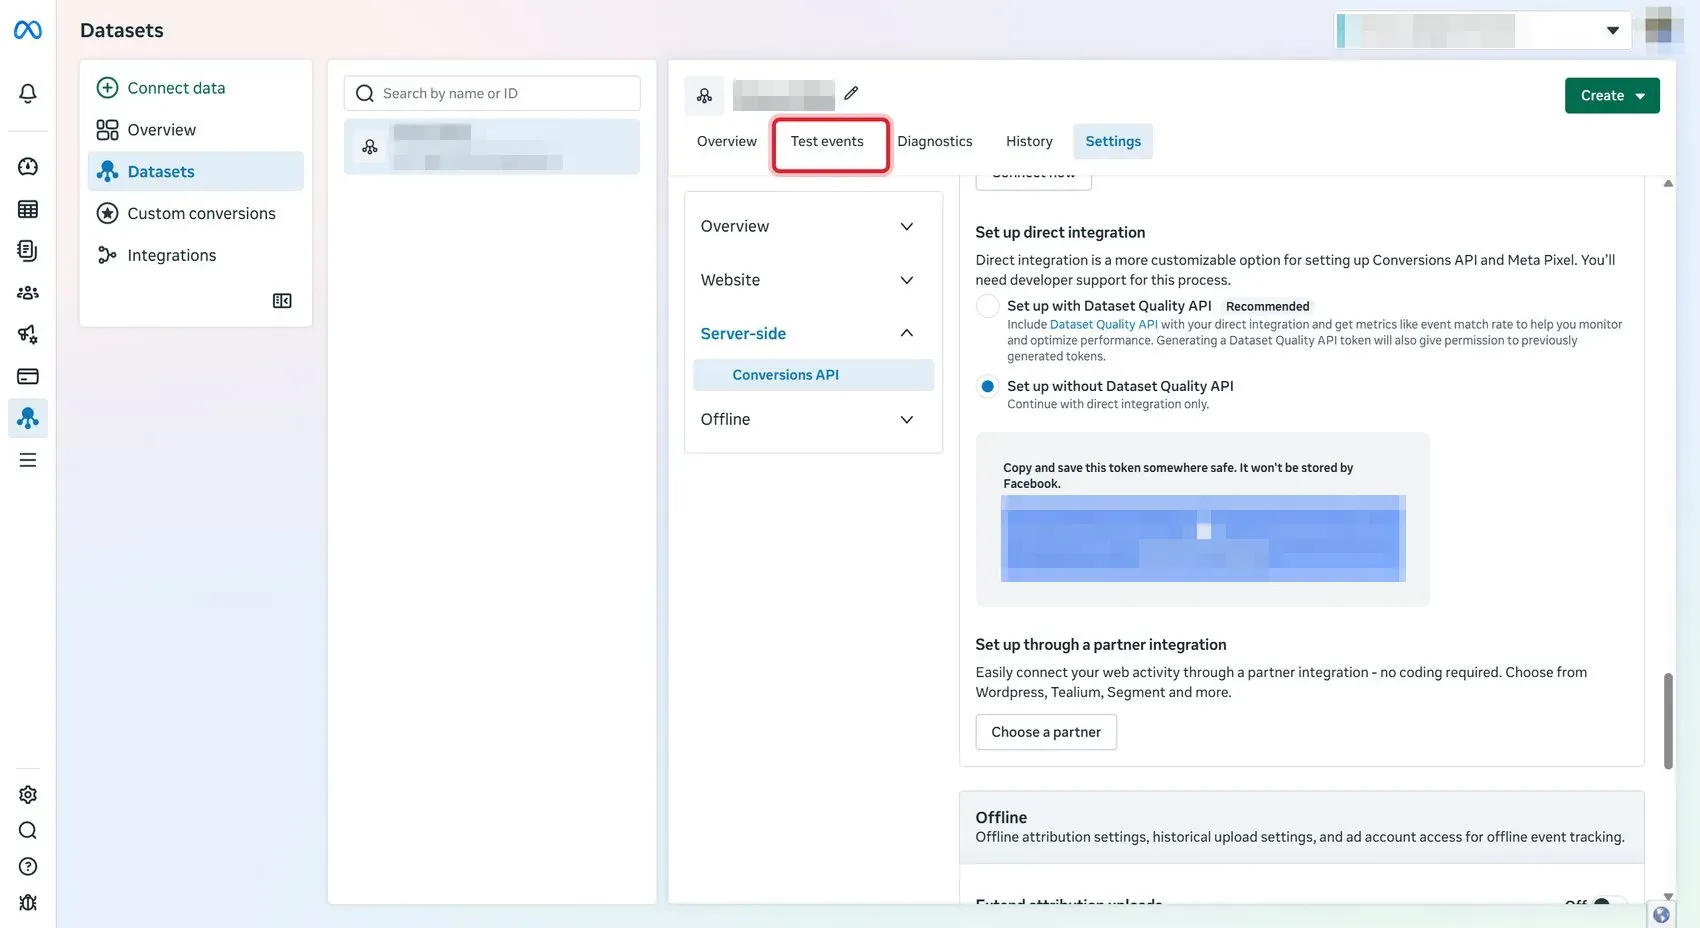
Open the dataset’s Test events tab.
-
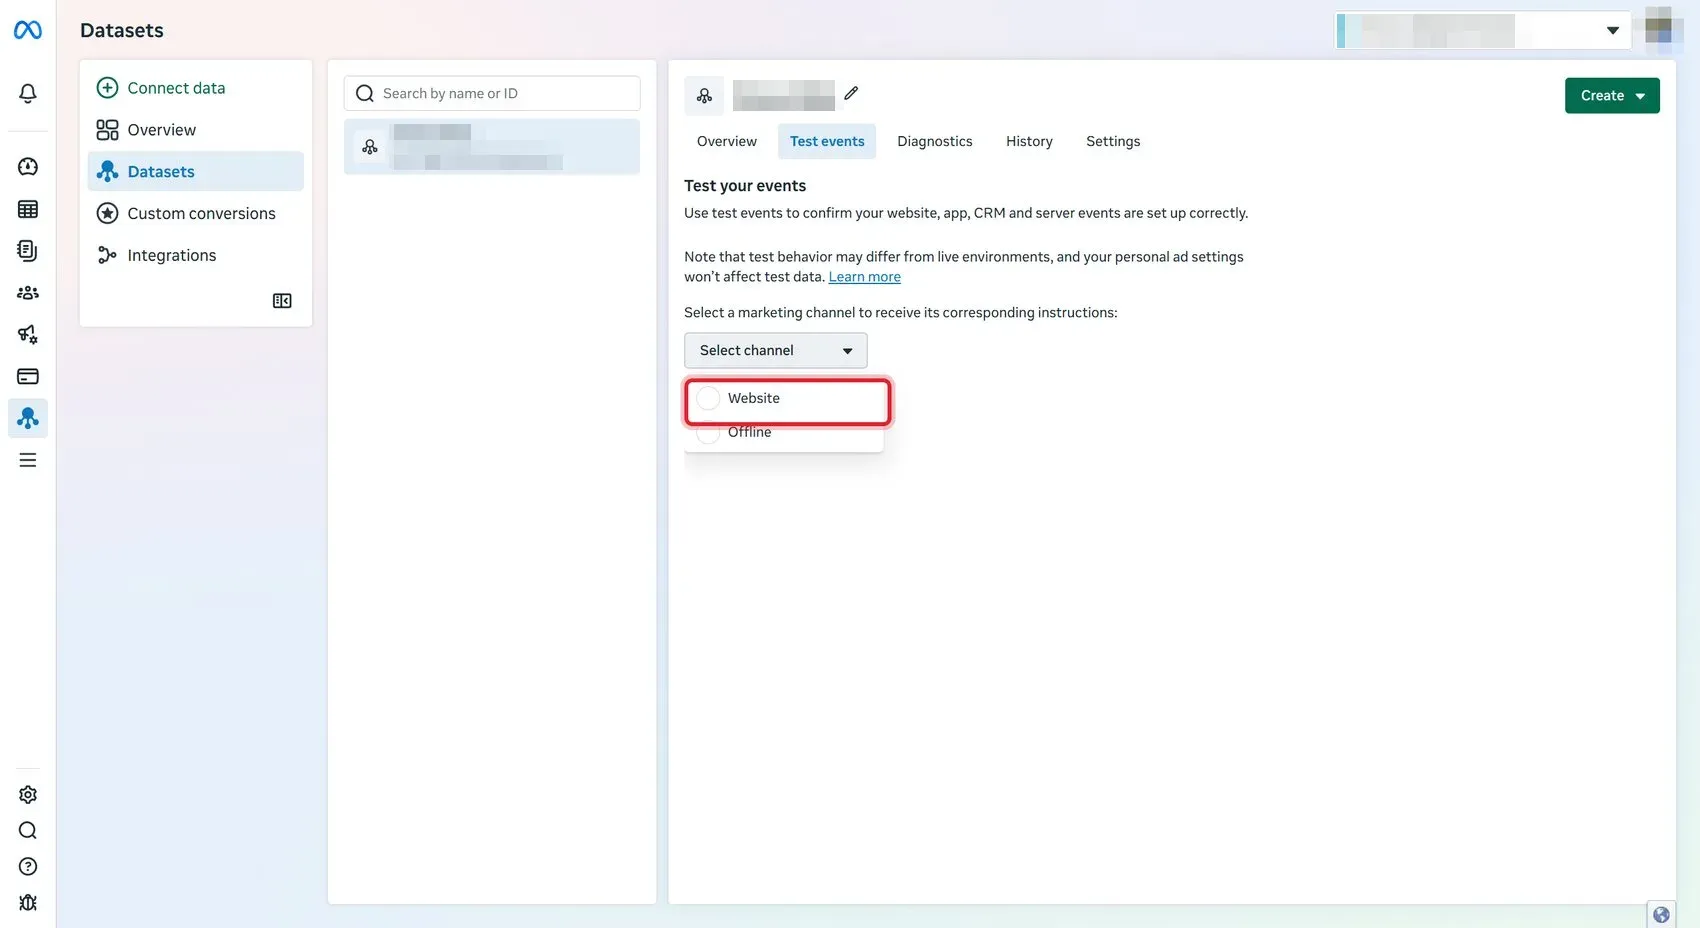
Choose the channel Website.
-
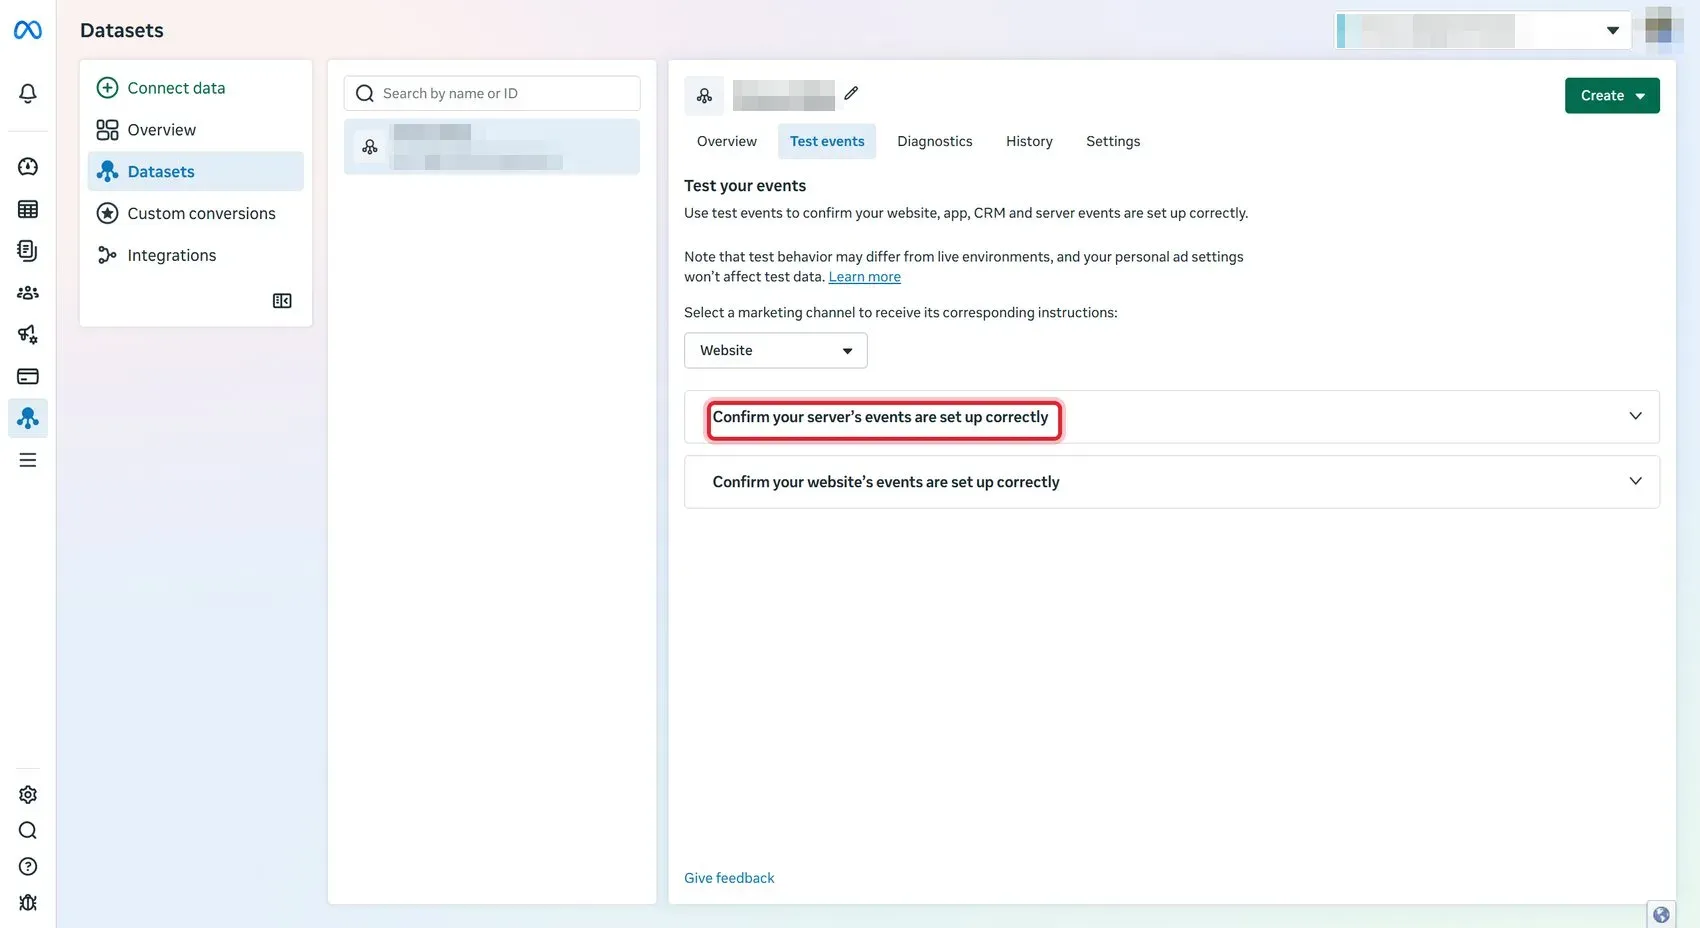
Open Confirm your server’s events are set up correctly.
-
Copy the code after
test_event_code:. It looks likeTEST12345.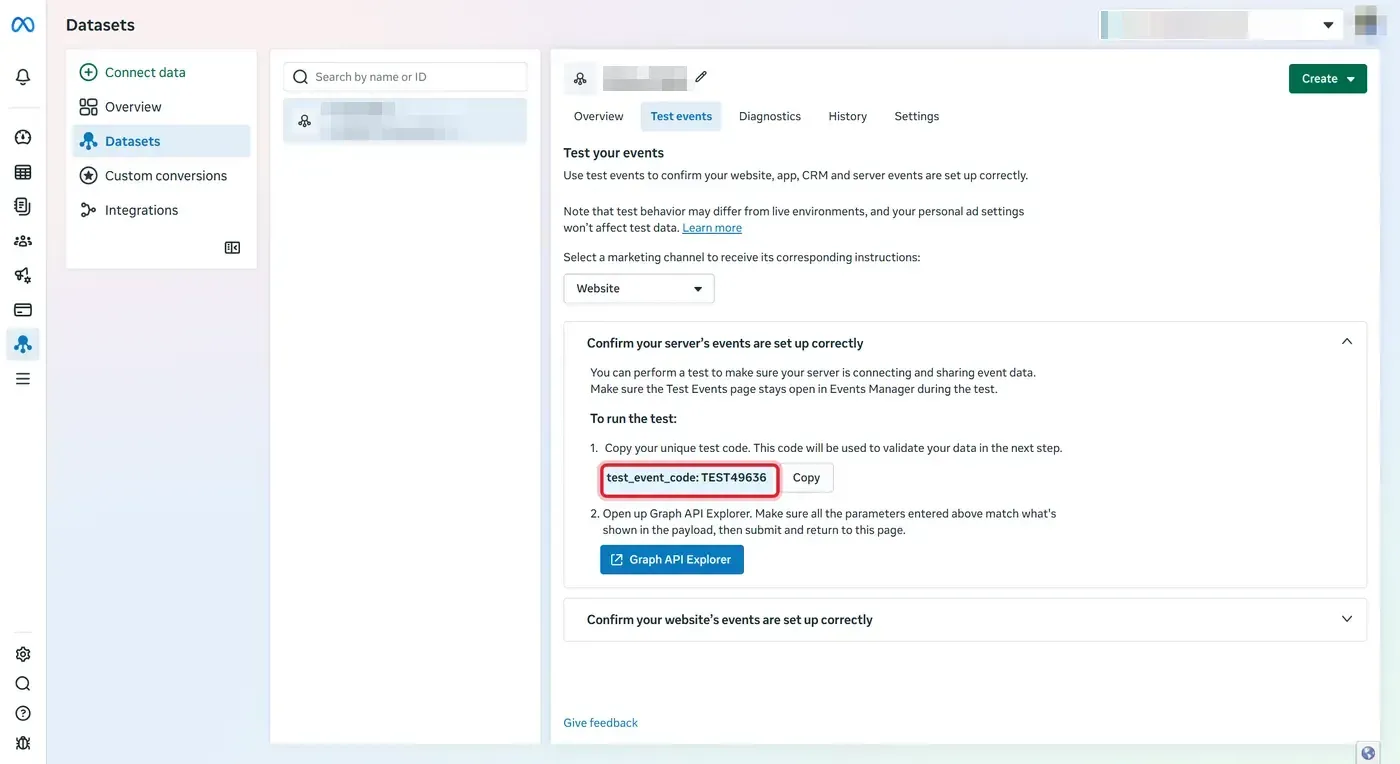
Step 6 - Put the values in the panel
Section titled “Step 6 - Put the values in the panel”| Value | Where to find it |
|---|---|
| Dataset ID | Under the dataset’s name in Events Manager. A number of 15 or 16 digits. |
| Access token | Step 4. A long text that starts with EAA. |
Choose one of two ways:
- Do it yourself. Open Marketing -> Tracking & Pixels and add the pixel with these values: see Add your pixel. Then send the test with the code from step 5.
- Send them to your account contact. Send the Dataset ID and the access token over a private channel. We add the pixel and ask for the code from step 5 when it is time to test.
After it is saved, the panel shows only the token’s first and last four characters, for example EAAa****ZDZD. Compare those eight characters to see which token is in use. To change the token later, click the pixel’s row, click Replace, paste the new token and Save (see About the secret). The old token stops being used as soon as it is replaced, and you can then delete it in Meta. To move to a new dataset, add it as a new pixel, then switch off or Remove the old row.
Real events show on the dataset’s Overview. The Event Match Quality score of each event appears there after a few days of traffic.
Step 7 - Use the events in your campaigns
Section titled “Step 7 - Use the events in your campaigns”The events your site sends
Section titled “The events your site sends”| Event | When | Extra data |
|---|---|---|
| PageView | Every page (browser) | - |
| CompleteRegistration | A player creates an account | - |
| Login (custom) | A player signs in | - |
| Purchase | A deposit is credited to the player’s wallet | value and currency: the deposit amount |
| FirstDeposit (custom) | The player’s first credited deposit, sent with its Purchase | value and currency |
| ViewContent | A player opens a game (server), or a promotion’s page (browser) | the game’s name and ID, or content_type promotion |
| Withdraw (custom) | A withdrawal is paid | value and currency |
This is the Built-in tracking mode. In Event Setup Tool mode your site sends no CompleteRegistration, Purchase or FirstDeposit: see Choose the tracking mode.
- Sign-ups and deposits are sent twice on purpose, from the player’s browser and from the server, with the same event ID. Meta counts each one once, and still gets it when a browser blocks tracking.
- A Purchase is sent when the deposit is credited, which for a bank transfer can be a while after the player submitted it. It still counts for the ad click: the connection details sent are the ones from when the player submitted the deposit.
- The matching details sent with every event are listed in What Legion sends.
Optimise for deposits, not sign-ups
Section titled “Optimise for deposits, not sign-ups”- Run conversion campaigns optimised for Purchase. Once you have enough volume (Meta suggests about 50 conversions per ad set per week), switch to value optimisation (highest value or ROAS). Every Purchase carries the real deposit amount.
- To buy new depositors, create a Custom Conversion on FirstDeposit and optimise for it: in Events Manager open Custom conversions, click Create and set the rule to event =
FirstDeposit. - Use CompleteRegistration only to start a new campaign that has too few deposits to learn from. Move it to Purchase once it has them.
Audiences worth building
Section titled “Audiences worth building”| Audience | How | Use it to |
|---|---|---|
| Registered, never deposited | Website custom audience: CompleteRegistration in the last 30 days, excluding FirstDeposit | Retarget with a first-deposit offer |
| Depositors | Website custom audience: Purchase in the last 180 days | Exclude from sign-up campaigns, and seed lookalikes |
| High-value depositors | Value-based lookalike, seeded from Purchase value | Find people like your best players |
| Lapsed players | Login in the last 90 days, excluding Login in the last 14 days | Bring players back |
| Game interest | ViewContent, filtered on the game name | Ads per game type |
Do not count twice
Section titled “Do not count twice”Your site already sends CompleteRegistration and Purchase. Do not also build them with Meta Event Setup Tool rules or Google Tag Manager, and check the dataset settings that make their own copies of our events: see Avoid double counting in Meta. If you need a different event, ask your account contact.
Turn on one setting: Automatic website matching (Settings - Website - Advanced matching). It lets the Meta pixel add the player’s hashed email and phone from your site’s forms, which raises Event Match Quality. It does not create extra events.
Check the data quality
Section titled “Check the data quality”- Overview in Events Manager: CompleteRegistration and Purchase show both Browser and Server as sources, with at least as many server events as browser events. Login, Withdraw, FirstDeposit and a game’s ViewContent come from the server only, and PageView from the browser only.
- Event Match Quality (click an event): aim for Good or better on Purchase. If it drops, tell your account contact: it usually means a matching detail stopped arriving.
- Automatic website matching is on (see above).
- Diagnostics tab: send any warning you see there to your account contact. It is usually something only we can fix.
- Test events lists what Send test event sends, and only while the tab is open with Website selected. Real server events never appear there: they show on Overview.
Related
Section titled “Related”- Tracking & Pixels - add the pixel, test it, and the dataset settings that avoid double counting.